I recently had the need to download and compile the Android Open Source Project (AOSP). Although I knew that it would take more than a day to set up my environment, download the source, compile the system and then test it, I had no idea that it would actually take me over three weeks to get everything working.
I run Linux (Fedora 20) on my computer and figured that it should be pretty straightforward to set up everything. I started with the official documentation on how to build Android. And then searched for some added documentation on customizing the environment for Fedora. This took some time because even the blog that was specialized for Fedora 20 had some incongruities with my system.
After finally getting my environment set up it was time to download the code. You can find the tags that you need here. Downloading was pretty straightforward and without problems but took over 2 hours.
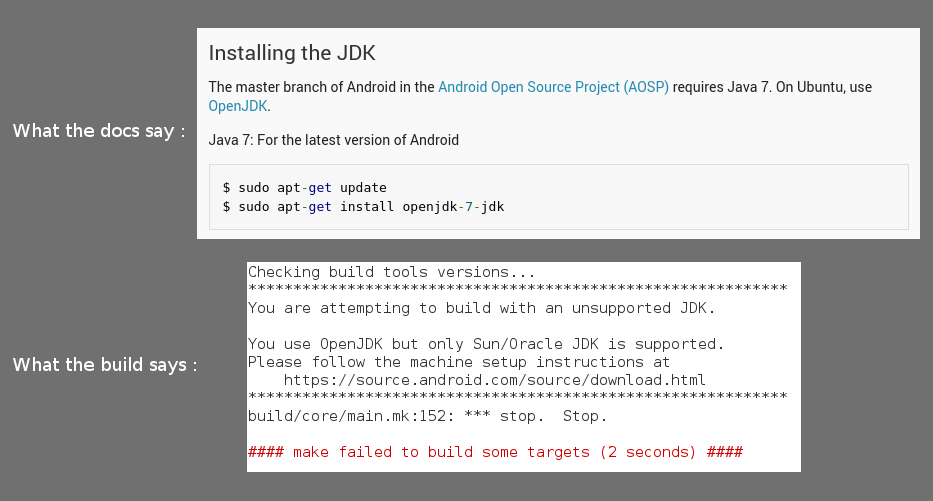
Finally I was all set up and ready to compile. This did not go well, at all. Many of the applications and tools that were installed did not work as expected. The build was stopped immediately because I did not have the correct version of Java. This was very annoying to me because I had actually changed my version of Java to match what the documentation asked for.
 |
| Java version error when compiling AOSP |
Once I finally had the Java installation in a stable condition it was time to try compiling again. And this went mostly well until I got a compile error stating that a file was corrupted. This was a difficult problem which ultimately led to a StackOverflow question. I recommend that you read the answer to that question as it may affect your every day usage of Linux. Once that was fixed I started the build again. But it would often break and stop, I would just restart it and it would go further, break and repeat. It wasn't very confidence inspiring to say the least.
One error that I did get that required a fix was this one:
make: *** No rule to make target `frameworks/rs/scriptc/rs_core_math.rsh', needed by `out/target/common/obj/APPS/Galaxy4_intermediates/src/RenderScript.stamp'. Stop.
This was pretty much the only error that had results from a Google search. The answer was to copy the source code from the Android source here. This did work but I don't really like this solution as this file is supposed to be generated and it wasn't.
Finally (day have passed by now), the source code completely compiled! It was time to launch it in the emulator (which was/is my goal, I have no need for this to run on a device). I launched the 'emulator' command and after a long while the emulator showed my home screen. Success!
Time to start up Android Studio and install my application! Which, of course, didn't work. After a few quick tries with AS I wanted to cut out the middle man and went straight to the command line. It tried 'adb shell pm install' which also failed. 'pm' is actually a script, so I went to the main executable 'app_process' which was the culprit and that resulted in this StackOverflow question about a segmentation fault (which didn't get answered). I then tried a new approach, I would bake my app right into the ROM. There are a few approaches to this, one of which is adding your code to the AOSP code base and compile the whole thing in one go. I wanted something simpler, just adding my apk to the build. I was finally able to do that and see my application run in the ROM.
At this point, things were looking up, and yet bleak at the same time, I was getting closer to my goal, but I was plague with problems and I didn't trust my build at all. There must be a better way. This is where Docker comes in.
About Docker
Someone commented on one of my Google+ posts saying that there was a Docker container for AOSP builds. That comment stayed on the back burner for a few days. Now was the time to check it out. I read up on Docker, watched a video and basically came up to speed. I was excited by this new idea which was much more portable and lean than a Virtual Machine. My first step was to find this Docker container that this person had mentioned. I searched on the Docker hub and although there were some containers there they did not work for me, and they had little to no documentation.
More searching brought me to some GitHub projects. I didn't really understand what was going on until I researched Dockerfiles. This was the ticket. I would get one of the docker files on GitHub, build it and my troubles would be over. Which of course didn't work. So I built my own Dockerfile, you will learn how to use it in the next section.
Installing Docker
Docker can be installed by many package managers on Linux.It can also be installed on other operating systems such as Mac or Windows. I installed it by following the instructions for Fedora 20. I will let you find the correct installation procedure for your OS by clicking one of those links and choosing it from the 'Installation' dropdown.Installation was, of course, a breeze. However, even after adding my username to the 'docker' group, I still have to run Docker with sudo. I will try to fix this in the future but for now it's not my main focus.
Setting up your environment
This is where Docker shines! Usually you would go to the Initializing a Build Environment page and hope that you are on the correct version of Ubuntu and that you can get all the correct versions of all the tools. Not today!
First, let's make sure that your Docker daemon is running.
With your Docker installation and the Dockerfile that I am providing this will all be done in one line. Feel free to go view the contents of the Dockerfile here.
First, let's make sure that your Docker daemon is running.
$ sudo systemctl start docker.service
With your Docker installation and the Dockerfile that I am providing this will all be done in one line. Feel free to go view the contents of the Dockerfile here.
$ sudo docker build -t <repositoryName/aosp> https://github.com/yartiss/docker-aosp-build.git
where you replace 'repositoryName' with your user name. It doesn't matter what name you use for now.
Running this command will take a while. But once it is done you will have a complete environment (called an image in Docker speak) in which you can compile AOSP!
We can then create a container by using the 'docker run' command on this image. (Note: This will not be the actual command that you use to create your real compilation container. This is just to see your container run)
$ sudo docker run -i -t <repositoryName>/aosp /bin/bash
Here we are telling docker to run a new container based on the <repositoryName>/aosp image and to launch 'bash' within that container. The '-i' argument tells Docker that we want an interactive container so that we can input commands. You should now see something like this:
builder@bc338942ef20:/$
Where 'builder' is the account's user name and 'bc338942ef20' is the ID of the container. The ID will always be recreated when you create a new container. You are now inside of your Ubuntu container! You can use it just like a normal Ubuntu system. You will find that all of the tools that you need to build AOSP are there, ready and waiting for you. You can try a few commands inside the container to take it for a test spin, and then close the container and return to your host OS by executing "exit".
Downloading AOSP
This section is a bit special because I had already downloaded the AOSP source code before deciding on using Docker. This means two things:
1) I would have to get the source code inside the docker container
2) I would have to get the ROM back out in order to test it.
I have solve these two problems by using a Docker Data Volume. A data volume is basically a reference to a file or folder on your host machine. Therefore the container can use the files from the host file system and changes to the files made within the container are seen by the host file system. Simply put the Docker container will be able to use my existing AOSP source code, and the ROM that is built inside the container will be accessible from my Fedora as usual.
What this means for you is that you will now download the AOSP source code onto your host operating system (not the container), if you don't already have it. To do this you will follow the official download documentation. Note down the AOSP root directory as you will need it in the next step.
Building the source code
Launching the build container
Now that you have Docker set up and the AOSP source code, it's time to build it.
1) Start a new terminal instance from your OS
2) Start the Docker daemon in that terminal
$sudo systemctl start docker.service
3) Run a new build container.
sudo docker run -i -t -v </path/to/Android_source>:/home/builder/Android_source -v /etc/localtime:/etc/localtime:ro <repositoryName>/aosp /bin/bash
where </path/to/Android_source> is the root directory of the AOSP source code on your host OS and where <repositoryName> is the name with which you created the docker image.
This command will start up your build environment inside your Ubuntu container and wire up the data volume to your AOSP source code on your host machine. There is also a parameter that will set your container's time to your host's time.
The Build!
You are now ready to build your ROM. This is done by following the normal build procedure.
 $ . build/envsetup.sh
 $ lunch aosp_x86-eng
 $ make -j4
That's it. Your build should start and finish in a few hours. See below if you have any problems
Good luck!
Note: This tutorial will create a ROM that is only meant to run in the emulator, this is why you should select the "aosp_x86-eng" build configuration.
The problems
SELinux
In my case, I have SELinux running on my host operating system. This caused an error or two when the container tried to access some files from my host OS. The first problem was that I was not able to 'cd' into the AOSP directory from within my container. And the second problem looked like this:
error while loading shared libraries: /usr/lib/libavformat.so.50: cannot restore segment prot after reloc: Permission denied
Starting up the 'SELinux Troubleshooter' application showed me the errors and the exact command to apply.
 If you believe that dexopt should be allowed execmod access on the file by default.
 Then you should report this as a bug.
 You can generate a local policy module to allow this access.
 Do
 allow this access for now by executing:
 $ sudo grep dexopt /var/log/audit/audit.log | sudo audit2allow -M mypol
 S sudo semodule -i mypol.pp
Proguard
I also had problems with Proguard not being the correct version. After a web search I was able to cherry-pick the Proguard source code. I had to admit that this was really weird because I have two version of Proguard in my source tree, I don't know if this is normal. The fix was to cherry pick the following commit 8a6199f0c36a778f22394364347a301b0b28e94b into the <source_root>/external/proguard/ project.
<source_root>/external/proguard $ git cherry-pick 8a6199f0c36a778f22394364347a301b0b28e94b
Running your ROM in the emulator
Once you have a successful build you will want to see your baby run. You will want to do this from your host environment, not your build environment. You can do this be running the 'exit' command from inside your container to get back to you host environment, but most likely you will just start up another terminal beside this one. Once inside this new terminal you will need to run the environment set up commands again so that your environment variables will be initialized.
Notice that we do not run the 'make' command. Now that our environment is set up we are one command away from seeing the results of our labour.
After a little while you should see the Android emulator running your ROM. Bravo!
Now call the emulator with the correct parameters in order to test the SD Card.
  $ . build/envsetup.sh
  $ lunch aosp_x86-eng
Notice that we do not run the 'make' command. Now that our environment is set up we are one command away from seeing the results of our labour.
$ emulator
After a little while you should see the Android emulator running your ROM. Bravo!
Running a more useful version of your ROM
Now that your ROM is running in the emulator you will probably need a more useful version of your ROM. There are many options that you can add to the emulator. You will probably want an SD Card and a camera. Let's add those right now. As a reminder, all of these steps are done in your host operating system, not inside the Docker container.The SD Card
In order for the emulator to present you with an SD Card when using your ROM you must first create an SD Card image and then pass that image as an argument to the emulator. You create an SD Card image by using the mksdcard command.
$ mksdcard -l mySdCard 1024M mySdCardFile.img
Now call the emulator with the correct parameters in order to test the SD Card.
$ emulator -sdcard <filepath>/mySdCardFile.img
The camera
In order to use a camera you have a few choices. You can emulate a camera or you can use a webcam as a camera. In order to use a webcam for a camera you must first list the webcams that are available on your computer.
  $ emulator -webcam-list
 emulator: WARNING: system partition size adjusted to match image file (550 MB > 200 MB)
 List of web cameras connected to the computer:
  Camera 'webcam0' is connected to device '/dev/video0' on channel 0 using pixel format 'YUYV'
Now we can call the emulator with the correct parameters enabling you to use camera applications.
$ emulator -camera-front webcam0
bringing it all together
Now that we have out options set up, let's call the emulator with all of them
$ emulator -sdcard <filepath>/mySdCardFile.img -camera-front webcam0
Conclusion
For most cases it should have taken you a day from reading this post to running your own ROM in your emulator. It took me about a month the first time I tried. Docker is a pretty amazing product and I hope that this post has made you want to find out more about it and about creating your own ROM.